
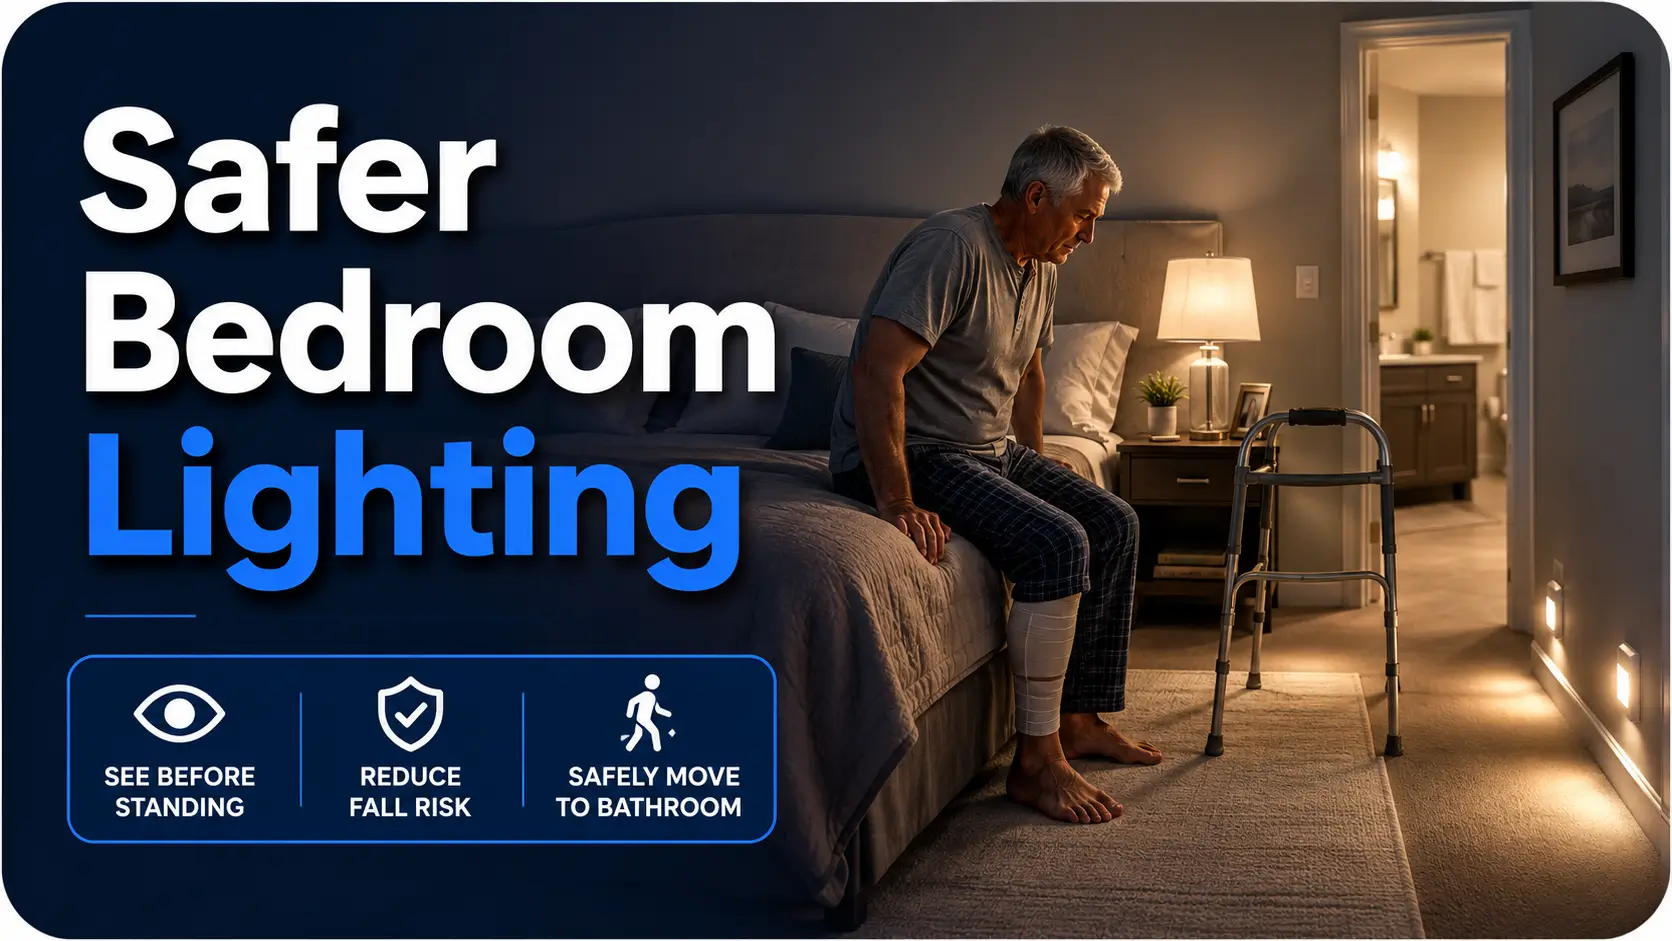
The First Night Home After Joint Surgery Can Feel Strangely Unfamiliar
Same bed. Same hallway. Same bathroom door. But now there is swelling, medication fog, a walker parked like a small metal roommate, and a body that does not turn on command.
A smart bedroom lighting setup after joint surgery is not about making the room bright enough to land a helicopter. It is about helping you see before you stand, find the switch before you reach, move toward the bathroom without glare, and avoid turning one sleepy step into a fall-risk event.
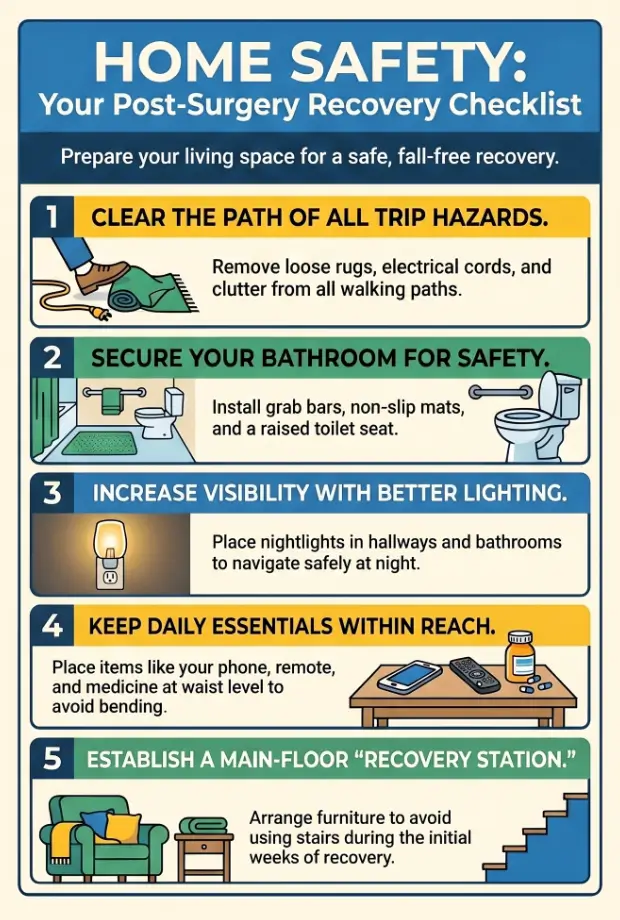
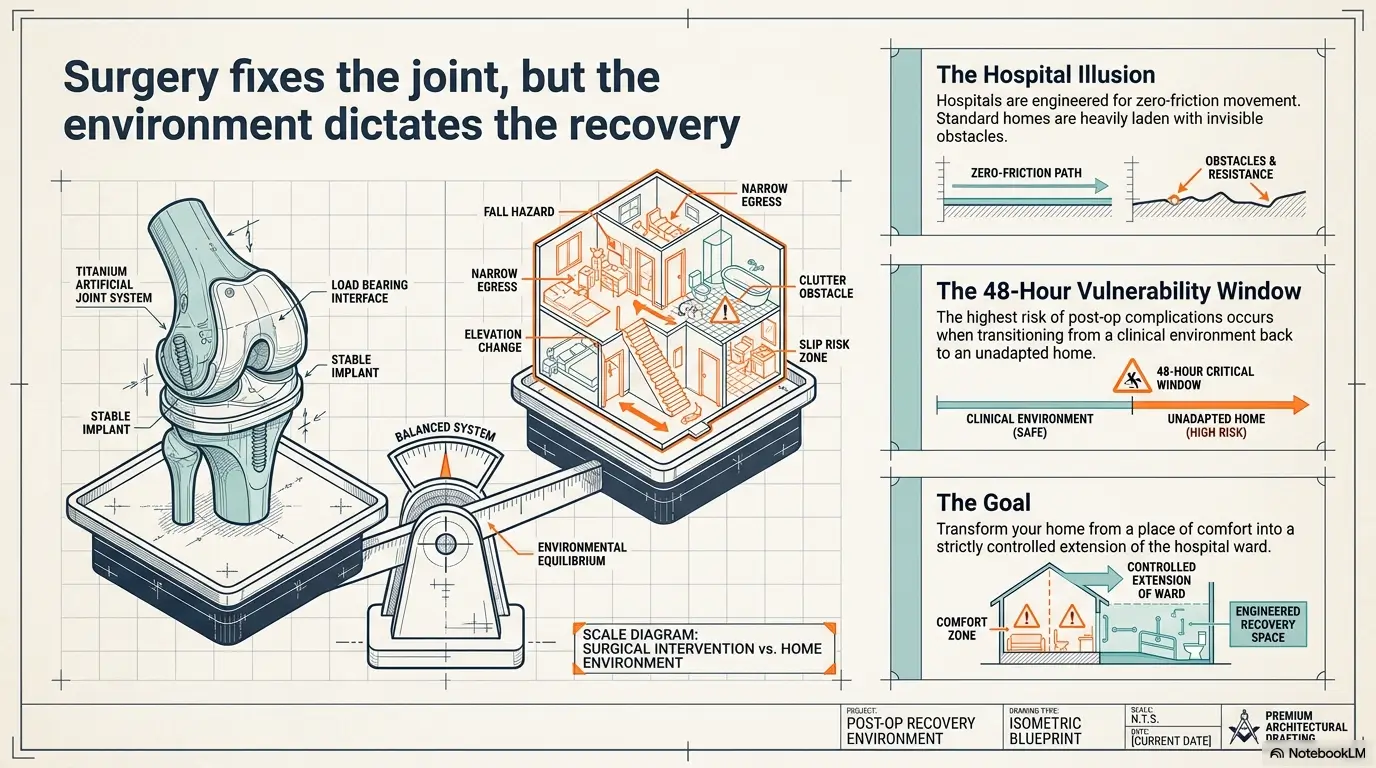
That matters because nighttime recovery is where good intentions often trip over cords, rugs, shadows, and “I know this room” confidence. A safer plan uses bedside lighting, low-level path lights, bathroom night lights, visible mobility aids, and cord-free routes. It also respects what orthopedic teams often stress after hip and knee surgery: prepare the home before the patient comes back.
Start here.
Make the room easier to read.
Make movement slower to begin.
Make the first step safer than the last thought before sleep.
Fast Answer
A good bedroom lighting setup after joint surgery should help the recovering person see the floor, switch, mobility aid, bathroom route, and essential items before standing. Use layered lighting: a reachable bedside lamp, low-glare path lights, bathroom night lights, and simple controls. Remove loose rugs and cords, keep the walker visible, and test the route from the pillow before the first night home.
Table of Contents
Safety Disclaimer
This guide is for general home-safety education, not medical advice. Follow the discharge instructions from your surgeon, physical therapist, occupational therapist, or home-health team. After joint surgery, lighting can support safer movement, but it does not replace mobility aids, caregiver help, medication guidance, transfer training, or bathroom safety equipment.
If the recovering person was told not to walk without assistance, do not use lighting as permission to move alone. If walking feels unsafe, the right answer may be more supervision, a different room setup, a bedside commode, home-health support, or a call to the care team.
First Night Home: Why Bedroom Lighting Matters More Than You Think
The room is familiar, but your body is not
After hip, knee, shoulder, ankle, or other joint surgery, the bedroom may look ordinary but function differently. The bed height matters. The path width matters. The lamp switch suddenly matters more than the lamp shade.
Pain medication can make timing softer around the edges. Swelling can change how quickly the leg responds. A shoulder immobilizer can make reaching across the body awkward. A walker can turn a simple pivot into a three-part negotiation.
The room has not changed, but the operating instructions have.
The goal is not “bright”; it is “safe enough before movement”
The safest post-surgery bedroom is not necessarily the brightest one. Bright overhead lighting can create glare, wake the person too sharply, and still require standing or twisting before the switch is reached.
The better goal is layered visibility. The recovering person should be able to identify four things before putting weight on the floor:
- The bed edge
- The mobility aid or stable handhold
- The clear path toward the bathroom
- The next light control or destination
Think of lighting as a quiet guide rail. It should not shout. It should point.
Here’s what no one tells you
The risky moment is often not the long walk. It is the sleepy half-second before the walk begins.
That moment sounds like, “I’m fine, I’ll just get up.” Then one foot searches for a slipper, one hand reaches into darkness, and the walker is two feet farther away than memory promised. The brain is already in the bathroom. The body is still negotiating with the mattress.
- Light should be reachable before standing.
- The floor should be visible before weight shifts.
- The walker, cane, or call device should never be hidden in shadow.
Apply in 60 seconds: Lie on the bed tonight and check whether you can find the lamp switch without lifting your shoulders.
Who This Is For, and Who Needs More Help
Best fit: joint replacement, repair, or mobility-limited recovery
This guide is useful for people recovering from hip replacement, knee replacement, shoulder surgery, ankle or foot procedures, tendon repairs, fracture care, and other conditions that limit standing, bending, twisting, reaching, or nighttime walking.
It also applies when pain is not the only issue. Stiffness, fatigue, swelling, nausea, sleep disruption, and new equipment can all make the bedroom feel like a poorly labeled airport at 2:00 a.m.
If knee surgery is the main recovery, the full room plan may overlap with a broader knee replacement apartment setup, especially when the bedroom, bathroom, and main chair all need to work together.
Caregivers setting up the room before discharge
Caregivers have a small window of power before the patient comes home. That is the moment to move furniture, tape cords, add night lights, and make the bathroom route boring in the best possible way.
Do not wait until the first bathroom trip to discover that the lamp cord crosses the walker path. That is not a discovery. That is a tiny domestic ambush.
Not for emergencies, severe confusion, or unsafe solo recovery
Lighting is not enough if the person cannot safely transfer from bed to standing, has fainting episodes, is unusually confused, has sudden weakness, or was clearly instructed to walk only with help.
If the person needs a raised toilet, grab bars, a shower chair, or a different mobility setup, lighting should support those tools, not substitute for them. For bathroom planning, a properly chosen toilet seat riser height can matter just as much as the light beside it.
Eligibility Checklist: Is a Lighting Upgrade Enough?
- Yes: The person can transfer safely when awake and using the prescribed aid.
- Yes: The main issue is darkness, glare, awkward switch access, or unclear pathways.
- Maybe: The person needs help at night but can move safely with a caregiver nearby.
- No: The person is confused, dizzy, fainting, falling, or unable to follow weight-bearing instructions.
Neutral action line: If two or more “maybe” or “no” items apply, call the care team before relying on a lighting-only fix.
The Bedside Triangle: Lamp, Phone, and Medication Without Reaching
Put the switch where the hand naturally lands
The bedside area should work from a lying or semi-reclined position. That means the light control belongs where the hand naturally lands, not where the furniture designer had a poetic afternoon.
Good options include:
- A touch lamp with a broad base
- A large-button remote clipped to the nightstand
- A rocker switch mounted near the bed
- A simple voice-controlled lamp if the person already uses voice assistants comfortably
- A rechargeable lamp with one obvious button
After shoulder surgery, place controls on the easier-to-use side. Do not make the person reach across the body or twist through pain just to turn on a lamp. If sleeping in a recliner is part of the plan, compare the bedroom route with your shoulder surgery recliner vs bed setup so the light, phone, and call device follow the actual sleeping location.
Keep the “must reach” zone boring and predictable
Nightstands after surgery should be dull, organized, and almost embarrassingly practical. This is not the week for decorative trays, stacked novels, scented candles, or a water glass hiding behind a ceramic fox.
Keep these items in a predictable zone:
- Phone and charger
- Medication schedule or pain log
- Water, if allowed
- Glasses
- Lamp control or remote
- Call bell, whistle, baby monitor, or caregiver alert tool
- Small flashlight as backup
Medication safety deserves its own light. If labels are hard to read, use a brighter task lamp only for that care task, not as the all-night guide light. For bigger recovery planning, an orthopedic appointment checklist can help keep medication questions, equipment needs, and follow-up concerns in one place.
Don’t make the patient fish for a tiny switch
Small lamp knobs are cute until a person with pain, swelling, numb fingers, or one usable arm has to hunt for them in the dark. Floor switches are worse if they require bending, toe-tapping, or reaching behind furniture.
The switch should be obvious by touch. If it is not obvious, add texture. A small strip of raised tape, a rubber grip, or a large plug-in button can turn “where is it?” into “there it is.”
Decision Card: Touch Lamp vs. Remote Control
| Option | Best when | Watch out for |
|---|---|---|
| Touch lamp | The person can reach the nightstand easily. | Some models are too sensitive or too bright. |
| Remote control | The lamp is slightly out of reach or shoulder use is limited. | The remote must be clipped or parked consistently. |
| Voice control | The person already uses it without frustration. | It can fail if Wi-Fi, wording, or hearing becomes an issue. |
Neutral action line: Choose the control the recovering person can use while half-awake, not the one that sounds clever in the store.
Path Lighting: Build a Soft Runway From Bed to Bathroom
Low-level lights beat sudden ceiling glare
Ceiling lights can be useful for cleaning, dressing, wound checks, or physical therapy notes. At night, they can feel like being interrogated by the sun.
Low-level path lighting helps the eyes stay oriented without blasting the room awake. Plug-in night lights, battery puck lights, under-bed strips, and hallway guide lights can show the route while keeping sleep disruption lower.
Warm, dim lighting is usually better for nighttime movement. Save clearer, brighter light for care tasks that require detail.
Light the exact route, not the whole room
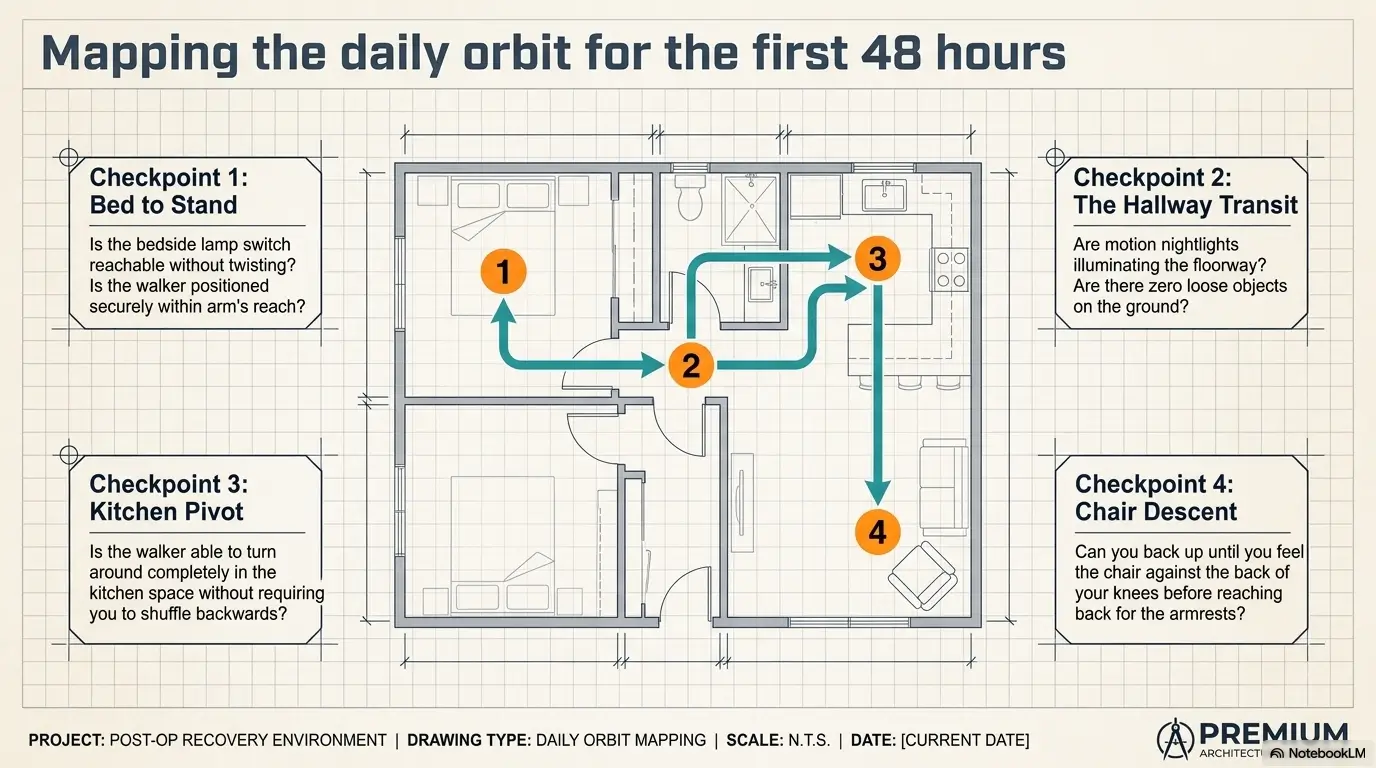
Start at the pillow and trace the actual path. The route often includes more micro-zones than people expect:
- Bed edge
- Slipper zone
- Walker or cane parking spot
- Doorway
- Hallway turn
- Bathroom threshold
- Toilet area
- Return path back to bed
Each zone needs enough light to answer one question: “Where does the next safe step go?”
The three-step test
Stand at the bed with the room in night mode. Look only three slow steps ahead. Can you see the floor, the mobility aid, the doorway edge, and the next handhold?
If not, add light where the route fails. Do not flood the whole room. Put light where the decision happens.
Pillow-to-Bathroom Lighting Map
Soft light shows where feet land.
Walker or cane is visible and reachable.
Threshold and door swing are easy to read.
Night light marks the destination.
Seat, riser, or grab point is visible.
Bathroom Doorway Danger: The Darkest Few Feet in the House
Use night lights at both ends of the route
The bedroom may have enough light. The bathroom may have enough light. The danger is often the in-between: the doorway, hallway bend, or bathroom threshold.
Use night lights at both ends when possible. One near the bedroom doorway. One near the bathroom entrance. If outlets are badly placed, use battery lights with adhesive backing, but place them where they will not be kicked or knocked loose.
Avoid shadows where the walker or cane lands
Walkers and canes need contrast. If the front walker legs disappear into a dark rug, glossy floor reflection, or furniture shadow, the user may misjudge distance.
Watch for:
- Dark furniture legs beside dark floors
- Bathroom thresholds that blend into the floor
- Rug edges that cast thin shadows
- Door swings that block a light source
- Slippers that disappear under the bed
For hip surgery, the bathroom route may overlap with bending and twisting limits. Pair lighting with practical movement habits from topics like how to put on socks after hip surgery, because the safest room setup usually combines visibility with fewer risky reaches.
Pattern interrupt: The toilet trip is the real design brief
Most bedroom lighting advice treats the lamp as decor. Recovery lighting should treat the toilet trip as the design brief.
Can the recovering person wake up, turn on a light, sit up, find the walker, walk to the bathroom, use the toilet, wash hands, and return without guessing? That is the real test. Not whether the room looks cozy on a furniture website where no one owns a raised toilet seat.
Common Mistakes: Good Intentions That Create Fall Hazards
Mistake 1: Using one bright overhead light only
One ceiling light seems simple. In practice, it can create two problems. First, the person may need to stand before turning it on. Second, sudden brightness can cause glare and disorientation.
A better setup uses a reachable bedside light first, then low-level route lighting, then brighter task lighting only when needed.
Mistake 2: Running extension cords across walking paths
Extension cords can quietly sabotage the entire plan. A lamp that improves visibility but adds a cord across the walking route has traded one risk for another.
Keep cords along walls, behind furniture, or secured with cord channels. Do not tape a cord in the middle of a walking path and call it “handled.” That is just a trip hazard wearing a tiny disguise.
Mistake 3: Leaving throw rugs because “they’ve always been there”
Throw rugs are familiar. That does not make them safe after surgery.
Toe clearance may be lower. Walker feet may catch. Nighttime depth perception may be worse. If a rug is loose, curled, thick, slippery, or near a turn, remove it for early recovery. You can reunite later if everyone behaves.
Mistake 4: Placing the walker in the dark corner
The walker should be visible from the bed and parked in the same place every time. It should not be behind the door, folded beside the dresser, or hidden by laundry.
If walker use is new, the person may also need a broader safety plan. A guide to walker pain management for seniors can help connect equipment setup with comfort, posture, and daily movement choices.
- Keep cords out of walking paths.
- Remove loose rugs from the bathroom route.
- Park the walker where it is visible from the pillow.
Apply in 60 seconds: Trace the path from bed to bathroom and remove one object your foot, cane, or walker could catch.
Motion Sensors: Helpful Helper or Startle Machine?
Where motion lights work beautifully
Motion lights can be excellent after joint surgery when they turn on gently, quickly, and predictably. They are especially useful when the person has limited hand use, uses a walker, or forgets switches while sleepy.
Good locations include:
- Under-bed strips that activate when feet approach the floor
- Bathroom entry lights
- Hallway plug-in sensors
- Closet-adjacent lights if clothing or supplies are stored there
- Low cabinet lights near the toilet route
Where motion lights can backfire
Not every motion light is a tiny angel with batteries. Some activate too late. Some are too bright. Some flicker on because a pet strolls through like a furry stage manager. Some cast moving shadows that startle a person already half-asleep.
Test motion lights before the patient comes home. Walk the route slowly. Use the same walker, cane, or slipper height if available. Then ask: did the light help, or did it create a surprise?
Set brightness like a whisper, not a stadium
Night lighting should support orientation. It should not announce itself like a baseball field.
Choose warm, low-output lights where possible. Avoid blue-white glare pointed directly into the eyes. If the motion light has brightness settings, start low and increase only if the floor, thresholds, and mobility aid remain hard to see.
Mini Calculator: How Many Night Lights Do You Need?
Use this simple planning tool before buying anything. It does not store data.
Estimated extra lights to consider: Add your numbers and calculate.
Neutral action line: Buy fewer lights first, test the route, then fill the exact dark spots rather than decorating the hallway with tiny moons.
Glare, Color, and Contrast: Make the Room Easier to Read
Warm light for night, clearer light for care tasks
Nighttime movement and medical tasks need different lighting. Soft warm light helps with orientation. Brighter, clearer light helps with reading medication labels, checking instructions, recording pain scores, or reviewing therapy notes.
Do not use one lamp for every job if it forces a bad compromise. A dim guide light can stay on or activate at night. A task lamp can be used briefly for care details.
If pain tracking is part of recovery, clear lighting can support better notes. A practical functional pain assessment helps connect pain to what the person can actually do, such as standing, dressing, walking, and sleeping.
Contrast helps more than decoration
Contrast tells the recovering brain what belongs where. A white switch on a white wall, a gray walker on a gray floor, and beige slippers under a beige bed are not a peaceful palette. They are a scavenger hunt.
Try simple contrast fixes:
- Use dark tape to mark a white light remote.
- Put a bright tag on the walker handle.
- Choose slippers that are easy to see.
- Keep medication papers on a plain clipboard.
- Use a contrasting tray for glasses, phone, and remote.
Don’t let shiny floors become little ice rinks for the eyes
Glare hides details. Polished floors, glossy tile, mirrored furniture, and bright bulbs pointed downward can make edges harder to judge.
The fix is not always more light. Sometimes the fix is better angle, lower brightness, a shaded bulb, or moving the light so it washes the floor gently instead of bouncing into the eyes.
Show me the nerdy details
Night vision depends partly on adaptation. A sudden bright ceiling light can make the eyes adjust in a way that feels briefly harsh, especially when the person is sleepy or medicated. Low-level indirect lighting gives enough contrast for orientation while reducing glare. For recovery rooms, the practical method is not to chase a perfect bulb number. Instead, test whether the patient can identify floor edges, thresholds, cords, furniture legs, slippers, and the mobility aid from the actual height and angle they will use at night.
Caregiver Setup: The 10-Minute Bedroom Walkthrough
Start lying down, not standing up
Caregivers often test the room while standing. That misses the problem. The patient begins from the pillow.
Lie down on the bed or recliner and look around from that height. Can you see the lamp control? The walker? The bathroom doorway? The phone? The water? The call device?
If the answer is “only if I lean over,” the setup is not ready.
Walk the route with one hand unavailable
Simulate the limitation. Keep one hand against your chest if shoulder surgery is involved. Hold a walker if knee or hip surgery is involved. Move slowly, as if each step needs permission.
This reveals the awkward little truths: the switch is on the wrong side, the rug catches the walker, the bathroom door blocks the night light, or the phone charger has become a tripwire with excellent branding.
Label the first week, then simplify
Temporary labels can help during the first few nights. Label the lamp remote, medication station, call button, and backup flashlight. Use large writing and high contrast.
After the routine becomes familiar, remove extra labels. The goal is not to turn the bedroom into a museum exhibit. The goal is to reduce decision-making while the body is busy healing.
Short Story: The Nightstand That Moved Two Inches
My neighbor once helped his mother prepare after knee surgery. He bought a sturdy lamp, added two night lights, cleared the hallway, and felt quietly heroic. Then she came home, lay down, and could not reach the lamp without twisting her new knee toward the edge of the bed. Everything was safe from the viewpoint of a standing, healthy son.
Nothing was safe from the pillow. They moved the nightstand two inches closer, turned the lamp so the switch faced the bed, and clipped the phone charger to the drawer handle. That tiny edit changed the first night. No drama. No new gadget. Just a room finally speaking the same language as the person using it. The lesson is plain: test the setup from the recovering body’s position, not from the helper’s confidence.
- Test from lying down first.
- Use the actual bathroom route.
- Move controls closer before adding more equipment.
Apply in 60 seconds: Sit or lie where the patient sleeps and move the lamp control within relaxed arm reach.
Budget Setup vs. Premium Setup: Spend Where Safety Improves
Under-$30 fixes that can matter
You do not need a luxury smart-home system to make a recovery bedroom safer. Many useful fixes are simple and inexpensive.
- Plug-in night lights for hallway and bathroom
- Battery puck lights for dark corners
- Cord clips or cord channels
- Large rocker-style lamp switch
- Brighter task bulb for medication reading
- Non-slip tape for a visible remote or switch
If the recovery involves more than lighting, compare the bedroom setup with broader orthopedic home care equipment needs, such as shower chairs, raised toilet seats, reachers, and stable seating.
Mid-range upgrades for smoother recovery
Mid-range upgrades may be worth it when the person wakes often, uses a walker, has limited hand function, or sleeps alone in a room near a bathroom.
- Motion-sensor under-bed strips
- Rechargeable bedside lamps
- Remote-controlled bulbs with simple remotes
- Sunrise-style lamps for morning orientation
- Backup battery lanterns for power outages
Skip the gadget if it adds confusion
A smart bulb is helpful only if it is reliable under stress. If it requires an app, a specific voice phrase, Wi-Fi troubleshooting, or a caregiver who knows which tiny icon means “bedroom path,” it may not belong in the first week of recovery.
Simple beats clever when pain medication, sleepiness, and urgency are in the room.
Coverage Tier Map: Bedroom Lighting Setup Options
| Tier | Setup | Best use |
|---|---|---|
| Tier 1 | Reachable lamp only | Very short routes with caregiver help |
| Tier 2 | Lamp plus bathroom night light | Basic nighttime orientation |
| Tier 3 | Bedside, path, and bathroom lighting | Most joint-surgery bedroom routes |
| Tier 4 | Motion sensors and backup lights | Frequent waking or limited hand use |
| Tier 5 | Caregiver alert plus full room safety setup | Higher fall risk or solo nighttime recovery concerns |
Neutral action line: Aim for the lowest tier that lets the person see, reach, transfer, and walk without guessing.
When to Seek Help: Lighting Cannot Fix Every Safety Problem
Call the care team if walking feels unsafe even with better lighting
Better lighting should make movement easier to understand. It cannot make an unsafe transfer safe by magic. Call the surgeon’s office, discharge nurse, physical therapist, or home-health team if the person has dizziness, repeated near-falls, confusion, worsening pain, new weakness, or trouble following weight-bearing instructions.
If pain control is a major barrier to safe movement, a broader joint replacement pain management conversation may be needed. Lighting helps the eyes. It does not calm an uncontrolled pain flare.
Ask about occupational therapy or home-health support
Occupational therapists and home-health professionals see hazards the rest of us have politely ignored for years. The lamp cord behind the bed. The rug lip near the bathroom. The towel rack pretending to be a grab bar. The low toilet that turns standing up into a full civic project.
Asking for help is not dramatic. It is practical. Recovery is already expensive in energy. Do not spend extra energy fighting furniture.
Emergency red flags stay medical
Seek urgent medical help for severe shortness of breath, chest pain, sudden one-sided weakness, fainting, uncontrolled bleeding, a fall with injury, or sudden severe confusion. Follow the emergency instructions provided by the surgical team.
For non-emergency but concerning orthopedic decisions, such as whether symptoms warrant a faster visit, an urgent care vs orthopedic clinic comparison can help frame the next step.
FAQ
What is the best bedroom light after knee replacement?
The best bedroom light after knee replacement is one the person can turn on before standing. A touch lamp, large-button bedside control, or simple remote is usually more useful than a ceiling light alone. Add low-level path lighting toward the bathroom so the person can see the floor, walker, doorway, and toilet route without glare.
Should I use motion-sensor lights after hip surgery?
Motion-sensor lights can be helpful after hip surgery if they turn on quickly, stay low-glare, and illuminate the route without startling the person. Test them before the first night home. If the light activates late, shines into the eyes, or is triggered constantly by pets, use a manual night light or dim plug-in light instead.
Is a night light enough after joint surgery?
Usually, one night light is not enough. A safer setup combines reachable bedside lighting, path lighting, bathroom lighting, and clear switch access. The key question is whether the person can see before standing and continue seeing the next safe step all the way to the bathroom and back.
Where should I put a lamp after shoulder surgery?
Place the lamp control on the easier-to-use side, usually the non-surgical side unless the care team gives different instructions. Avoid reaching across the body, twisting, or pulling on a cord. A large-button remote or touch lamp may be easier than a small knob.
Are smart bulbs safe for post-surgery recovery?
Smart bulbs can be safe if they are simple, reliable, and already familiar to the recovering person. They are less helpful if they require app navigation, exact voice commands, Wi-Fi troubleshooting, or caregiver intervention. In early recovery, dependable low-tech controls often win.
What lighting helps prevent nighttime falls?
Low-glare lighting that shows the bed edge, floor, mobility aid, doorway, hallway turn, bathroom entrance, and toilet area can reduce guessing during nighttime movement. Lighting should be paired with fall-prevention basics: remove loose rugs, secure cords, clear clutter, and keep the walker or cane visible.
Should the bedroom stay bright all night?
No. A bright room all night can disrupt sleep and create glare. Use soft guide lighting instead. Keep brighter light available for care tasks, medication reading, or wound checks, but rely on dim, warm route lighting for ordinary nighttime movement.
What should caregivers check before the patient comes home?
Caregivers should check switch reach, phone access, medication readability, cord hazards, rug edges, walker visibility, bed height, bathroom route lighting, toilet setup, and backup lighting. Test everything from the pillow, not just from a standing position.
Next Step: Do the Pillow-to-Bathroom Light Test Tonight
One concrete action
Lie on the bed, turn off the main light, and trace the full route to the bathroom with your eyes before standing. If you cannot clearly see the floor, doorway, mobility aid, and bathroom entrance, add lighting before the first recovery night.
This closes the loop. The room may be familiar, but recovery changes the way the body reads it. A good lighting plan gives the bedroom back its instructions: where to reach, where to step, where to pause, and when to ask for help.
The 60-second checklist
- Bedside switch reachable without twisting
- No cords across the walking path
- Walker, cane, or crutches visible from the bed
- Bathroom light easy to activate
- Medication label readable under task lighting
- Phone and caregiver alert within reach
- Backup flashlight or rechargeable lamp available
If you can make only one improvement in the next 15 minutes, move the bedside light control within relaxed arm reach and clear the route from bed to bathroom. Small edit. Large dignity. The room becomes less of a puzzle and more of a quiet recovery partner.
Last reviewed: 2026-05.